hexo评论系统与站点计数

评论系统与站点计数

添加 多说 或者 Disqus 第三方评论系统。当同时设置了 多说 和 Disqus 时,优先选择多说。

使用多说

  1. 注册多说

    1. 登录后在首页选择 “我要安装”。

    2. 创建站点,填写站点相关信息。注意,多说域名 这一栏填写的即是你的 duoshuo_shortname。

  2. 编辑站点的 _config.yml 注意,不是主题的_config.yml文件 ,添加 duoshuo_shortname 字段,设置如下

1
duoshuo_shortname: your-duoshuo-shortname

(注)duoshuo short name: 你的多说二级域名去掉 .duoshuo.com 部分

使用 Disqus

编辑站点的 _config.yml ,添加 disqus_shortname 字段,设置如下

1
disqus_shortname: your-disqus-shortname

多说评论显示 UA

需要配置 duoshuo_info 这个字段

1
2
3
4
5
duoshuo_info:
ua_enable: true
admin_enable: true
user_id: 1234567
admin_nickname: 主编大人

配置 user_id 和 admin_nickname 字段。 请访问 多说,登录并访问「我的主页」获取 user_id , 此 ID 是 网址最后那串数字。

显示站点总访问量

找到站点的themes/next/layout/_partials目录下的footer.swig文件
将以下脚本和标签插入到文件中

1
2
3
<script async src="https://dn-lbstatics.qbox.me/busuanzi/2.3/busuanzi.pure.mini.js"></script>
本站总访问量 <span id="busuanzi_value_site_pv"></span> &nbsp&nbsp&nbsp
您是第<span id="busuanzi_value_site_uv"></span>个来到的小伙伴

插入到这里

1
2
3
4
5
6
7
8
9
10
11
<div class="powered-by">
{{ __('footer.powered', '<a class="theme-link" href="http://hexo.io">Hexo</a>') }}
</div>
<div class="theme-info">
{{ __('footer.theme') }} -
<a class="theme-link" href="https://github.com/iissnan/hexo-theme-next">
NexT{% if theme.scheme %}.{{ theme.scheme }}{% endif %}
</a>
</div>
# 插入到这里
{% block footer %}{% endblock %}

显示单页面访问量

修改themes/next/layout/_macro目录下的post.swig文件

位于文件开头,在第三个参数的位置,增加is_pv字段

1
{% macro render(post, is_index, is_pv, post_extra_class) %}

插入以下代码,用于区分文章页面跟首页

这里不用像”显示站点总访问量”中那样安装脚本,否则会出现重复计数的问题。

1
2
3
4
5
{% if is_pv %}
<span>&nbsp; | &nbsp;
<span id="busuanzi_value_page_pv" ></span>次阅读
</span>
{% endif %}

插入这个位置

1
2
3
4
5
6
7
8
9
10
11
12
13
14
15
16
17
18
19
20
{% if post.comments %}
{% if (theme.duoshuo and theme.duoshuo.shortname) or theme.duoshuo_shortname %}
<span class="post-comments-count">
&nbsp; | &nbsp;
<a href="{{ url_for(post.path) }}#comments" itemprop="discussionUrl">
<span class="post-comments-count ds-thread-count" data-thread-key="{{ post.path }}" itemprop="commentsCount"></span>
</a>
</span>
{% elseif theme.disqus_shortname %}
<span class="post-comments-count">
&nbsp; | &nbsp;
<a href="{{ url_for(post.path) }}#comments" itemprop="discussionUrl">
<span class="post-comments-count disqus-comment-count" data-disqus-identifier="{{ post.path }}" itemprop="commentsCount"></span>
</a>
</span>
{% endif %}
{% endif %}
#插入到这里
</div>
</header>

修改themes/next/layout目录下的post.swig文件

这个文件是文章的模板

找到以下代码,给render方法传入刚才第一步中设置的参数。

1
2
3
4
5
6
7
8
9
10
11
12
13
14
{% block content %}
<div id="posts" class="posts-expand">
#render方法第二个参数is_index为是否为首页
#第三个参数is_pv为我们刚才设置的是否显示计数
{{ post_template.render(page, false, true) }}
<div class="post-spread">
{% if theme.jiathis %}
{% include '_partials/share/jiathis.swig' %}
{% elseif theme.duoshuo_shortname and theme.duoshuo_share %}
{% include '_partials/share/duoshuo_share.swig' %}
{% endif %}
</div>
</div>
{% endblock %}

修改themes/next/layout目录下的index.swig文件

这个文件是首页的模板

找到以下代码,给render方法传入刚才第一步中设置的参数。

1
2
3
4
5
6
7
8
9
10
{% block content %}
<section id="posts" class="posts-expand">
{% for post in page.posts %}
#render方法第二个参数is_index为是否为首页
#第三个参数is_pv为我们刚才设置的是否显示计数
{{ post_template.render(post, true, false) }}
{% endfor %}
</section>
{% include '_partials/pagination.swig' %}
{% endblock %}

至此,我们的站点计数功能就做好了

iterm2配色

iterm2配色方案

#配色来源

1
2
3
4
5
6
7
8
iterm2官网所提供的配色方案iTerm2-Color-Schemes
在schemes目录下提供了很多种配色方案
altercation大神的solarized配色方案solarized
在这个repo中给出了多个编辑器的配色方案,显然我们需要的是目录
iterm2-colors-solarized下的

Solarized Dark.itermcolors 和
Solarized Light.itermcolors

#步骤

  1. 下载配色方案
  2. 首先打开home目录下的 .bash_profile 文件

    1
    2
    3
        vim ~/.bash_profile
    ```
    粘进去

    export CLICOLOR=1
    LSCOLORS=gxfxcxdxbxegedabagacad
    export PS1=’[\033[01;32m]\u@\h[\033[00m]:[\033[01;36m]\w[\033[00m]\$ ‘

    1
    保存退出

    source ~/.bash_profile
    ```
    文件生效

  3. 进入iterm2
    Preferences->Profiles->Terminal 标签下的 Terminal Emulation 选择的是 xterm-new
    之后在 Preferences->Profiles->Colors 标签,点击 Load Preset 列表中的 Import 进行导入配色方案,之后进入text标签,不勾选Draw bold text in bright colors选项。
    重启iterm2

mac恢复允许“任何来源”的选项

恢复允许“任何来源”的选项

1
2
3
我们可以在终端中使用 spctl 命令来实现:

  sudo spctl --master-disable

输入上述命令之后,我们可以发现,久违的“任何来源”回来了:

如果在系统偏好设置的“安全与隐私”中重新选中允许 App Store 和被认可的开发者 App,即重新打开 Gatekeeper 后,允许“任何来源”App 的选项会再次消失,可运行上述命令再次关闭 Gatekeeper。

mac localhost server

1
建立方式很简单,直接在终端中运行:

1
sudo mkdir ~/Sites

2建立“站点”文件夹之后,检查 /etc/ 文件夹下面是不是有“haibor.conf”这个文件:

1
/etc/apache2/users/

如果没有,那么你需要创建一个,取名为“你的名字.conf”,可以使用 vi 或者 nano 这两种编辑器之一来创建。

1
sudo vi /etc/apache2/users/你的名字.conf

创建之后将下面的这几行内容写到上面的 conf 文件中:

1
2
3
4
5
6
<Directory "/Users/你的名字/Sites/">
Options Indexes MultiViews
AllowOverride All
Order allow,deny
Allow from all
</Directory>

3
文件保存之后,给它赋予相应的权限:

1
sudo chmod 755 /etc/apache2/users/你的名字.conf

4接下来重启 Apache,以使该配置文件生效:

1
sudo apachectl restart

github插件2

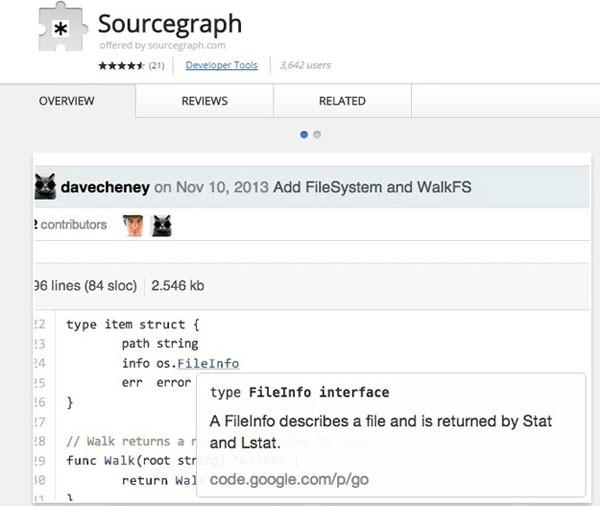
1 SourceGraph

Sourcegraph Chrome 扩展允许你像使用一个很好的 IDE 那样浏览源代码。它为 Github 上的代码添加了即时文档和类型提示,并为每一个标识符添加了跳转到定义处的链接。

image4

2 Zenhub

ZenHub 是一个 Github 的本地项目管理工具,可以无缝的集成。

image5

github插件3

  1. GitHub Cue
    image1
    GitHub-Cue 会根据用户正在查看的库给出一些建议或者推荐一些你可能感兴趣的库。

2.Github Highlight Selected
image1
当你在 Github 源代码中选中一个词的时候,这个插件会为你高亮显示这个文件中其他相同的词。

3.GH Diff Highlight
image1
允许你像使用一个很好的 IDE 那样浏览源代码。它为 Github 上的代码添加了即时文档和类型提示,并为每一个标识符添加了跳转到定义处的链接。除此之外,它还会高亮显示源代码之间的差异。

创建Git仓库(git@oschina&sourceTree)

创建Git仓库(git@oschina&sourceTree)

1.创建远程仓库

进入https://git.oschina.net/点击+号,创建新项目

2.部署公钥(可以暂时不用公钥的)

在项目界面,管理-》部署公钥-》添加公钥,按照git@oschina上面的步骤,一步步生成公钥并添加到项目中。

3.将远程仓库与本地仓库关联起来(也是最关键的一步)

(1)复制远程仓库的git地址。

(2)打开sourceTree,依次点击:新仓库-》从URL克隆-》将远程仓库的地址粘贴到“源URL”,目标路径选择自己要存放的位置(路径A)(一定得是一个空的文件夹,否则会报错)-》克隆

4.在路径A下创建工程,或者将原来就存在的工程放在路径A下面。

5.打开sourceTree,查看是否检测到文件变动。

node.js 版本升级

一行命令搞定node.js 版本升级

首先安装n模块:

1
npm install -g n

第二步:
升级node.js到最新稳定版

1
n stable

n后面也可以跟随版本号比如:

1
2
3
n v0.10.26

n 0.10.26

另外分享几个npm的常用命令

1
2
3
4
5
6
7
8
9
10
11
12
13
14
15
16
17
npm -v          #显示版本,检查npm 是否正确安装。

npm install express #安装express模块

npm install -g express #全局安装express模块

npm list #列出已安装模块

npm show express #显示模块详情

npm update #升级当前目录下的项目的所有模块

npm update express #升级当前目录下的项目的指定模块

npm update -g express #升级全局安装的express模块

npm uninstall express #删除指定的模块

隐藏dsstore

隐藏dsstore

隐藏文件的方法解决了 mac系统如何显示和隐藏文件 苹果Mac OS X操作系统下,隐藏文件是否显示有很多种设置方法,最简单的要算在Mac终端输入命令。显示/隐藏Mac隐藏文件命令如下(注意其中的空格并且区分大小写): 显示Mac隐藏文件的命令:defaults write com.apple.finder AppleShowAllFiles -bool true 隐藏Mac隐藏文件的命令:defaults write com.apple.finder AppleShowAllFiles -bool false 或者 显示Mac隐藏文件的命令:defaults write com.apple.finder AppleShowAllFiles YES 隐藏Mac隐藏文件的命令:defaults write com.apple.finder AppleShowAllFiles NO 输完单击Enter键,退出终端,重新启动Finder就可以了 重启Finder:鼠标单击窗口左上角的苹果标志–>强制退出–>Finder–>重新启动 别处转来的